![]()
MS2-Extra
Microsquirt Module Hardware
|
MS2-Extra Microsquirt Module Hardware |
|
Please Note: All of these instructions / diagrams are to be used at your own risk, like most things there is more than one way to do the same thing, what we have tried to do is to offer a method that we have tested or that others have tested for us. No warranty expressed or implied. Use at your own risk. |
Microsquirt Module Introduction
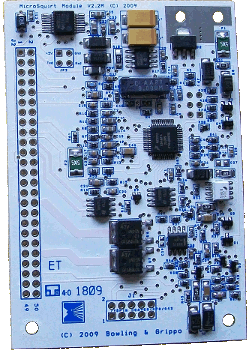 |
The Microsquirt module is a bare-board version of the Microsquirt ECU, which in itself is a single card Megasquirt-2 based ECU.
The module is intended to form the basis of your own ECU and purchase of
the card gives you license to use any of the Megasquirt 2 firmwares on
it. You can create your own ECU around the Microsquirt-module using whatever board(s) or components you see fit.
As the module is intended as the heart of an ECU, it is up to the user to provide interface circuits and suitable connections to "the outside world". If you require a packaged ECU then consider one of the other products in the Megasquirt portfolio. |
Connections / wiring
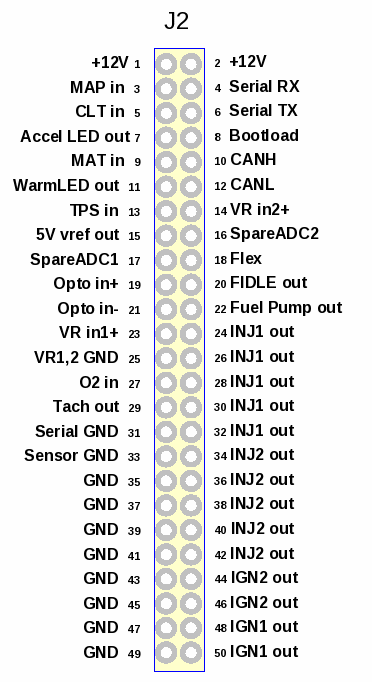 |
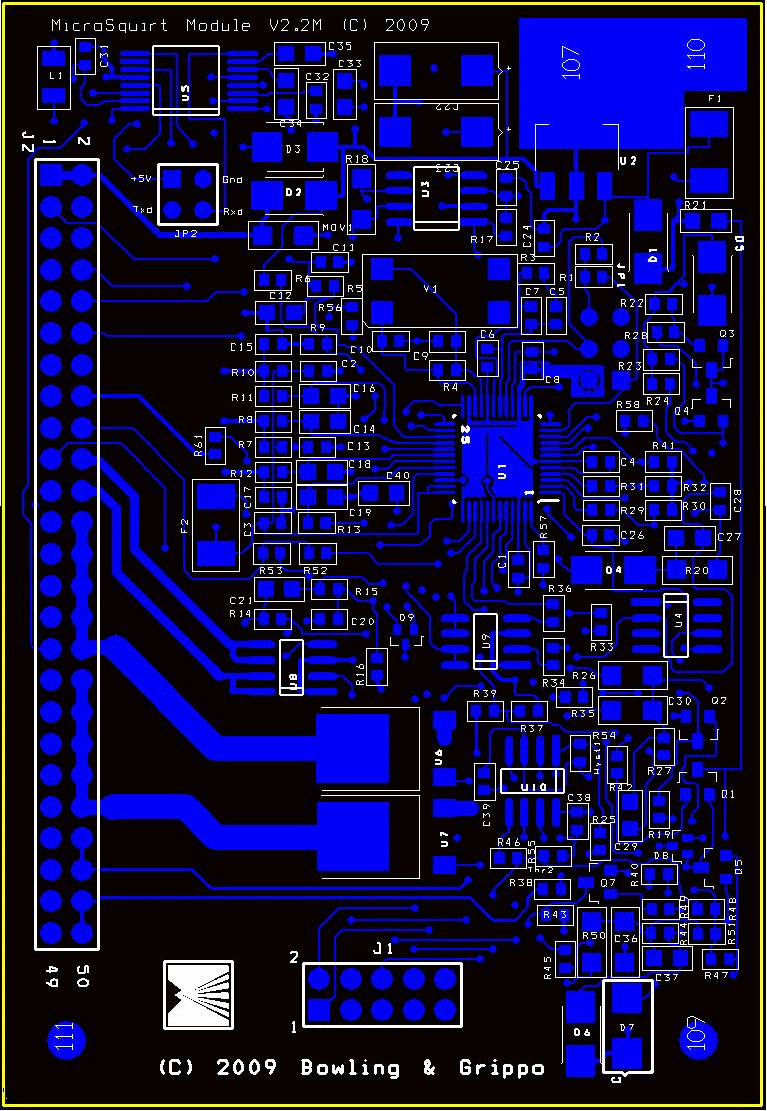
The main 50 pin header connector is J2: 1,2: +12V fused power input3: 0-5V MAP sensor input 4: Serial RX comms to tuning computer 5: Coolant temperature sensor 6: Serial TX comms to tuning computer 7: Accel LED "D16" mid current ground out, SparkD 8: Bootload, the "boot jumper" rarely used 9: Manifold Air Temp sensor 10: CAN communications H 11: Warmup LED "D15" mid current ground out, SparkC 12: CAN communications L 13: 0-5V Throttle position sensor input 14: VR tach signal no.2 (+) input 15: 5V vref out (for TPS) 16: SpareADC2 0-5V analogue input or digital output 17: SpareADC1 0-5V analogue input or digital output 18: 0-5V Flex fuel input 19: Opto tacho in(+) 20: FIDLE mid current ground out 21: Opto tacho in(-) 22: Fuel Pump mid current ground out 23: VR tach signal no.1 (+) input 24,26,28,30,32: INJ1 out. Use all the INJ1 pins in parallel 25: VR1,2 GND 27: 0-5V Oxygen sensor input 29: Tach "D14" low current ground out 31: Serial GND 33: Sensor GND 34,36,38,40,42: INJ2 out. Use all the INJ2 pins in parallel 35,37,49,41,42,43,45,47,49: Power GND. Use all Power Grounds in parallel 44: IGN2 low current output, SparkB 46: IGN2 out 48: IGN1 low current output, SparkA 50: IGN1 out |
|
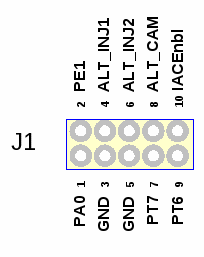
The secondary 10 pin header is J1: 1: PA0 Generic output (raw CPU pin)2: PE1 Input only Tableswitching (raw CPU pin) 3,5: GND 4: ALT_INJ1, digital injector 1 signal 6: ALT_INJ2, digital injector 2 signal 7: PT7 Stepper idle channel (IAC) or additional injector 8: ALT_CAM zero crossing setpoint for VR2 9: PT6 Stepper idle channel (IAC) or additional injector 10: IACEnbl Stepper idle chip enable |
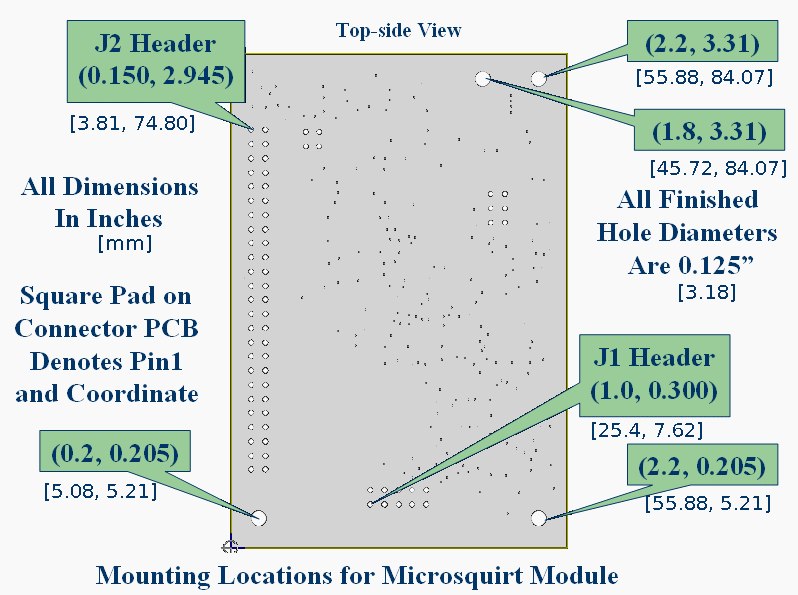
Physical dimensions
External connections
(Note: this section needs extending)
The sensor inputs to the Microsquirt module are largely the same as other Megasquirt products.
The injector outputs are capable of driving four high impedance (14 ohms) injectors each. If you have low impedance injectors (typically 2.5 ohms) then it is advised to use series resistors or an external peak and hold box. Do not directly connect low impedance injectors if you want reliability.
The logic coil outputs are suitable for driving LS1 type ignitors or other logic ignition modules. Do NOT connect them directly to a coil.
Silkscreen and schematics
Schematics are available here
Software
As the module is essentially a Megasquirt2, you should use the MS2/Extra firmware and documentation.
The manual is here.
Be sure to use the www.msextra.com forum for any support questions.
Microsquirt Utility board
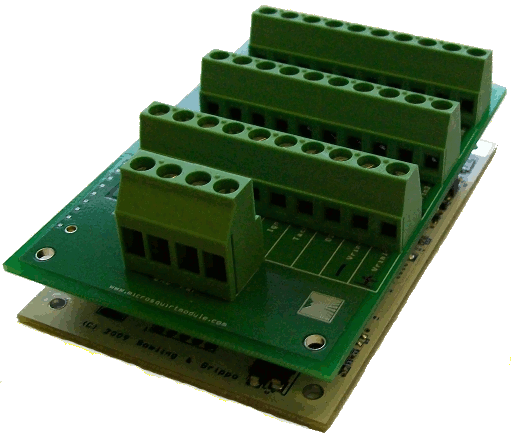
The utility board provides screw terminal access to the J2 connections on the Microsquirt module. It can be used as a compact test bed for the module. However, the pin header has to be soldered on to the top of the Microsquirt card, instead of the bottom as is normally used. Therefore the utility board will require a dedicated module card. Also, there is no provision to use the J1 pin header.
See also a video of the Utility Board.
If you have a question, comment, or
suggestion for this FAQ please post it on the forum.
No part of this manual may be reproduced or changed without written permission from James Murray, Ken Culver and Philip Ringwood.